Word For Mac 2016 Insert Horizontal Line
How to use the Format Painter in Word 2016 In this HowTech tutorial, we’re going to show you how to use the format painter in Word 2016. To get started, hover your cursor over the Format Painter button located under the Home tab. Use the Format Painter to quickly copy formatting from one selection of text or graphics in a document to another. Select the text or graphic you like the look of, click Format Painter, and then apply it to the text or graphic you want to look the same. Format Painter option is a best way to copy formatting style of word, sentence or paragraph & apply to any plain text. Create sample styles & use those styles on simple text using Format Painter which saves your lot of time during work. I've been using outlook for more years than I care to remember. Recently I switched to Mac and stayed with office (2016 V. Somehow I cannot find the format painter when I write e-mails in outlook. Can't use format painter in word 2016 for mac.
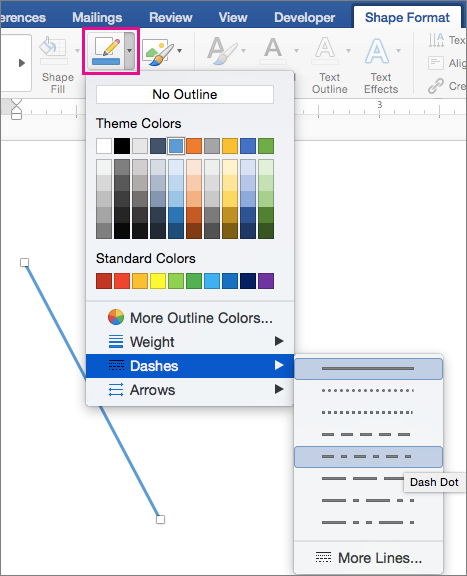
To insert one, you need to navigate to the Insert tab -> Shapes and select line shape. Then drag the mouse over the required length and position of the document. Then drag the mouse over the.
There are many word processing tools available but once worked in the comfort of Microsoft Word, you may not like any other software. It is pretty sure no one exactly knows the complete features Word offers. Adding dividers is one such hidden feature and you can do this with shortcuts.
In this article we will see how to add dividers quickly in Word. How to Add Dividers in Microsoft Word Quickly? You can add dividers with different methods.
Using Hyphens and Underscores The simplest and most used method is to use continuous hyphens and underscores. The advantage is that you can define the length and alignment of the divider.
Divider using hyphens: —————– Divider using underscore: ____________ 2. Quick Way to Add Dividers with Shortcuts • The quick way is typing three times hyphens and then pressing enter key (— and ⏎). This will create a full width divider. • Use three asterisks and enter (*** and ⏎) to if you want a dotted line. • Use three equal signs and enter (=== and ⏎) to add a double line. • Use three underscores and enter (___ and ⏎) to make a divider with medium thickness.
• Use three ampersand or number signs and enter key (### and ⏎) to create a thicker line with borders. • And finally with three tildes and enter (~~~ and ⏎) to create a wavy divider line. Shortcuts to Insert Dividers in Microsoft Word How to Delete the Divider? Well, you have created the divider and now is the time to see how to delete it. You may find it difficult to delete the dividers since those dividers are not actually lines – they are borders acts like an underline. Follow the below instructions in order to delete the dividers. • Select the divider and the paragraph that precedes it. • Click on the “Home” tab and then the “Border” button in the “Paragraph” group.
• Click on “No Border” or “None” option. Thin Divider 4. Using Default Menu Option The last option to insert divider on a Word document is using horizontal line menu option available under “Paragraph” group under “Home” tab.

Click on the “Borders and Shading” button and click on the “Horizontal Line” option to insert a divider on your document. If you want to insert a fancy divider, choose the menu option “Home > Paragraph group > Borders and Shading Button > Borders and Shading”. Family tree software for mac free. Click on the “Horizontal Line” button on the popup box and select the divider you want to insert.
Word automatically formats items like quotes, bulleted and numbered lists, and horizontal lines. When you type at least three dashes, underscores, or equal signs in a paragraph by themselves and press “Enter”, the characters are automatically converted to a single, thick single, or double horizontal line, respectively. This feature can be a timesaver, except when you want the actual characters in your document and not have Word convert them into a horizontal line that extends the width of your document.
There are a few methods for either undoing or removing the horizontal line or preventing Word from automatically creating it. The first method is to press “Ctrl + Z” right after typing the characters and pressing “Enter” to undo the automatic creation of the horizontal line. The line is removed and your characters remain. However, undoing the creation of the line every time may not be practical. You can remove the line later, but you should understand how Word adds the horizontal line. When you press “Enter” at the end of the characters that Word replaces with the line, Word removes the characters and adds a bottom border to the paragraph just above the one where you typed the characters. To remove the line, place the cursor in the paragraph just above where the line was added.
Make sure the “Home” tab is active. If not, click the “Home” tab on the ribbon. In the “Paragraph” section of the “Home” tab, click the down arrow on the right side of the “Borders” button and select “No Border” from the drop-down menu. This removes the line from below the paragraph in which you placed the cursor. If you don’t want to have to undo the creation of an automatic horizontal line every time it happens, you can prevent it from happening by turning off this feature. To do so, click the “File” tab. On the backstage screen, click “Options” in the list of items on the left.
On the “Word Options” dialog box, click “Proofing” in the list of items on the left. In the “AutoCorrect options” section, click the “AutoCorrect Options” button. The “AutoCorrect” dialog box displays. Click the “AutoFormat As You Type” tab. In the “Apply as you type” section, select the “Border lines” check box so there is NO check mark in the box. Click “OK” to accept the change and close the “AutoCorrect” dialog box. You are returned to the “Word Options” dialog box.