Quickbooks For Mac Returned Check
For Mac users, iTunes is the undisputed king of media managment and playback. Every new computer comes with it pre-installed, and if you have an iPod, iPhone, or iPad, then you’ll need it for syncing media and backi.  A good music player for Mac is very much needed for passionate music listeners, inspiring us to listen more, organize music libraries, learn more about favorite This Mac music player is free and open-source and is available for Mac OS X, Windows, Linux, Android, iOS. It offers remote control, music. In addition to UPnP the Nativ Vita Network Music Player also supports streaming of music via SMB. Simply select the SMB option and enter the network The path to the shared folder you need to enter in the Vita’s settings will be the IP address of your computer/NAS and the name of the folder, e.g. How to play content of UPnP/DLNA server in VLC. I'd simply advise to use ArkMC for iOS/Android or for Mac. It's much easier and it works without any bugs, fast and simple in use.
The Mac version of the Quickbooks Pro is 6 times the cost of the PC version, $225/year for the PC vs. $1330/year for the mac version AND the mac version has compatibility issues.
Offers an automated and seamless integration of your Lightspeed Retail data with the below accounting system: • QuickBooks Online • QuickBooks Desktop (2014 or later) • Xero • Exact Online • Sage Cloud Accounting Alternatively, you can manually export your Lightspeed Retail data and import it into QuickBooks for MAC or Windows. NOTE: QuickBooks 2013 for MAC and up require a workaround in order to import correctly. In Lightspeed Retail, go to Reports > QuickBooks Settings & Options and set the 'Extra' field under Sales Tax to 'N/A' and then save the settings. To export from Lightspeed Retail • Open your Firefox browser. • In Lightspeed Retail, go to Reports > QuickBooks Settings & Options.
• Select the data Lightspeed Retail exports to your accounting software by going to. • If you have a QuickBooks account, check that the accounts match. This prevents a new account being created in your QuickBooks when you import your file. • At the top of the screen, click the grey Exports button. • If this is your first time exporting, on the top right, click the green New QuickBooks Export button. • From the Dates section in the Start Export On, End Import On, and Shop fields, select your date range and shop.
• Click the Generate All Export Data button. • From the left hand menu, review the data included in each section. • If data is included in the Errors section, for assistance. • From the Export section, select the Export Verified checkbox.

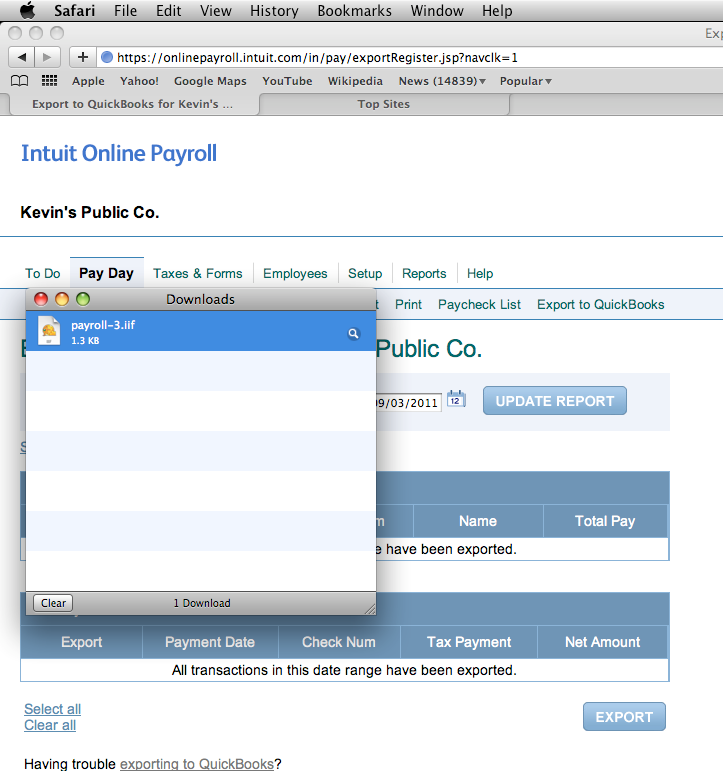
• Click Export QuickBooks Data and save the.iif file to your desktop or downloads folder. • Import your.iif file into your QuickBooks for MAC or Windows.