How Make A Bootable Usb For Mac
This Terminal command, called createinstallmedia, can create a bootable copy of the installer using any drive connected to your Mac. In this guide, we're going to use a USB flash drive, but you could also use a normal hard drive or SSD that's connected to your Mac. The process is the same, regardless of the destination. Whatever media you use to create the bootable Mac OS installer on, it will be completely erased by the createinstallmedia command, so be careful.
Whether you're going to use a flash drive, a hard drive, or an SSD, be sure to any data on the drive before you begin this process. How to Use the Createinstallmedia Terminal Command. • Make sure that the Mac OS installer file is present in your /Applications folder. If it's not there, or you're not sure of its name, seethe previous section of this guide for details on the installer file name, and how to download the needed file. • Plug your USB flash drive into your Mac. • Check the flash drive's content.
Steps to make a Windows 10 bootable USB from ISO file from a Mac. Even simple things become a chore for Mac users. Whether you want to take a screen shot or just wanting to add a hashtag, Mac users have it the hard way. To create a bootable USB for macOS Mojave on windows 10, the very first thing you need is the macOS Mojave. Since the macOS Mojave Public beta has been released, you have to download that from App store if you are a developer account.
During this process, so if there's any data on the flash drive that you want to save, back it up to another location before proceeding. • Change the flash drive's name to FlashInstaller.
You can do this by double-clicking the drive's name to select it, and then type in the new name. You can actually use any name you wish, but it must exactly match the name you enter in the createinstallmedia command below. For this reason, I strongly suggest using a name with no spaces and no special characters. If you use FlashInstaller as the drive's name, you can just copy/paste the command line below instead of typing the rather long command into Terminal.
• Launch Terminal, located in /Applications/Utilities. • Warning: The following command will completely erase the drive named FlashInstaller. • In the Terminal window that opens, enter one of the following commands, depending on which OS X or macOS installer you're working with. The command, which starts with the text 'sudo' and ends with the word 'nointeraction' (with no quotes), can be copy/pasted into Terminal unless you used a name other than FlashInstaller.
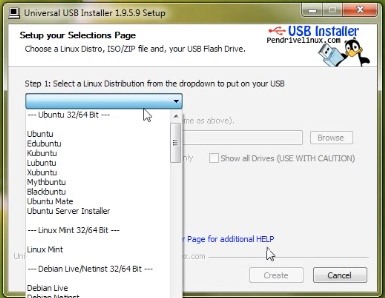
With Ubuntu 16.04 LTS inching ever closer to release, now feels like a good time to recap how easy it is to make an bootable Ubuntu USB drive. Just like the live CD, a live Linux usb allows you to boot Ubuntu on your machine without needing to install it on your hard-drive. Live images are a useful way to test hardware compatibility (things like Wi-Fi drivers, touch-screens, etc) before committing to a full install. In this article we show you 3 ways of making a bootable thumb drive on the 3 major desktop operating systems: Windows, OS X and Ubuntu.
Microsoft word excel powerpoint for mac. How to Create a Bootable Linux USB Drive on Windows Our preferred tool for creating bootable Ubuntu sticks in Windows is ‘Linux Live USB Creator’ – often called ‘Lili’ for short. The free and open-source app is incredibly straightforward to use. Just follow each step in turn. It’ll even download the.iso file for you if you don’t have one to hand. If you don’t like this app (or can’t get it run) there are alternatives, including Rufus ( How to Create a Bootable Linux USB Drive on Mac OS X For an OS that’s prized for its simplicity it’s strange that creating a bootable USB on a Mac is not easy.
But it’s not impossible, either. It has to be said that while the success rate of images created using this app is poor (you can’t use the USB’s it creates to boot a Mac, for instance) it is the ‘easiest’ way to create a bootable Ubuntu USB on Mac OS X. Like LiLi above, Unetbootin can even automatically download a Linux distro.iso file, which is handy if you feel the itch to distro hop but don’t know exactly which flavor to try. Remember that to boot from a USB on a Mac you will need to hold down the Alt/Option’ key during boot. Other GUI alternatives include How to Make a Bootable Linux USB Drive on Ubuntu Ubuntu comes with an app to create live USB drives already installed.
Open the Dash and search for ‘USB Startup’. Launch the app, locate your.iso file, choose your USB drive (double check it’s the correct one!) and then hit ‘install’. You can also configure persistence though I’ve never had a USB boot when I’ve enabled this feature. What’s your preferred method for creating bootable Linux USB drives? Let us know in the comments!